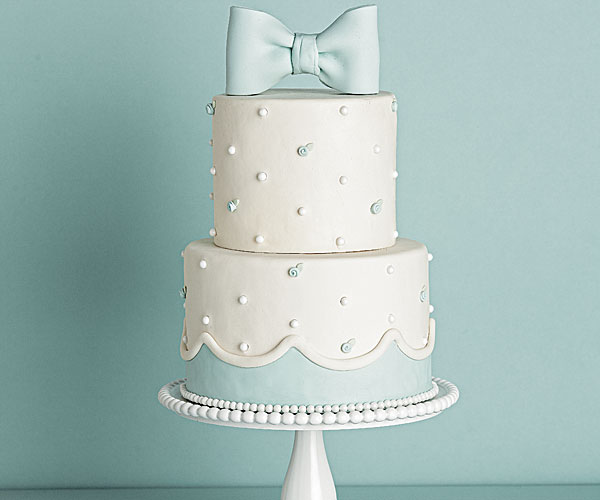
This cake is an effective place to begin in the event you’ve by no means made a multi-tiered cake or labored with fondant earlier than. The decorations are pretty easy, which helps you to deal with the fundamental strategies of stacking the tiers and making a clean fondant end. The design was impressed by classic hobnail glass and the smooth, snuggly, nubby chenille blankets that may be discovered tucked right into a new child’s crib—excellent for a child bathe. Or keep on with an all-white palette to show it right into a easy marriage ceremony cake, or use deeper or brighter colours for a candy birthday cake.
Advertisements
Components
For the cake and filling
- 2 6-inch diameter spherical desserts, both Vanilla Chiffon Cake or Satan’s Meals Cake
- 2 8-inch diameter spherical desserts, both Vanilla Chiffon Cake or Satan’s Meals Cake
- 12 cups (3 recipes) Vanilla Swiss Meringue Buttercream, or one of many variations
For the ornament
- 4-1/2 lb. white fondant
- 2 lb. pale blue fondant
- 2 oz. leaf inexperienced fondant
- One 4-oz. container of 6-mm edible white pearls
- Piping gel, for attaching decorations
Instruments
- 6- and 8-inch spherical cake boards
- Lengthy serrated knife
- Ruler (ideally metallic)
- Stage
- Massive offset spatula
- X-ACTO knife or scalpel
- Plastic fondant rolling pin
- 4 dowels, 1/2 inch in diameter, a minimum of 6 inches lengthy
- Fondant smoothers
- Cake turntable
- 3-1/2-inch spherical cookie cutter
- Extruder (elective)
- Small paintbrush
Preparation
Cut up and fill the cake layers
- Apply a small smear of buttercream (in regards to the dimension of a half greenback) to the 6-inch cake board. Place one of many 6-inch desserts on the board. Flip the cake pan the wrong way up and place it subsequent to the baked cake. Use the pan as your information and run a serrated knife throughout the domed high of the cake to chop it stage.
- As soon as the cake is leveled, use a ruler to search out the middle level across the outdoors of the cake, and mark it by flippantly scoring the cake with a knife.
- With the knife in a single hand and your different hand flat on high of the cake to maintain it regular, use a clean sawing movement to slowly lower across the cake from the skin edges towards the middle till the knife is right through. Stage and cut up the opposite 6-inch spherical cake in the identical method.
- Unfold 1-1/2 cups of the buttercream on high of 1 6-inch layer, leaving a 1/4-inch border across the fringe of the cake. Place a second cake layer on high, urgent down on the heart and smoothing your palms out to the edges; this forces the buttercream to fill within the area with out going over the sting.
- Repeat with the remaining 2 6-inch cake layers and one other 1-1/2 cups of buttercream between every. Use the extent to test that the highest and sides of your cake are straight.
- Cut up, fill, and layer the 8-inch cake rounds in the identical method, utilizing the 8-inch cake cardboard and about 2 cups of buttercream between every layer.
- Refrigerate each the 6-inch and 8-inch cake tiers for a minimum of 2 hours (or as much as in a single day) earlier than persevering with.
Make the fondant bow cake topper
- Roll out two items of the blue fondant to 1/8 inch thick. Minimize two ribbons 6 inches lengthy and three inches large.
- Pinch the corners on the finish of 1 strip, then press each corners in towards the middle pinched level. Repeat on the reverse finish, and do the identical for the second strip. To create the bow loops, fold the pinched ends of every strip collectively. Assist the bow hold its form by inserting a parchment paper tube into every loop to let the loops dry open. Enable the bow to dry for a minimum of 1 day.
- To assemble the bow topper, place the 2 loops finish to finish. Roll out a small strip of fondant and lower it right into a strip that’s lengthy sufficient to wrap across the ends to carry them collectively. Wrap the strip across the loops and pinch collectively till it’s adhered. Enable the bow to dry in a single day earlier than utilizing.
Crumb-coat the tiers
- Utilizing a big, clean basketweave tip, pipe horizontal strips of frosting across the sides of the 6-inch cake tier till it’s lined. Cowl the highest of the cake by piping circles, beginning on the periphery and dealing your strategy to the center.
- Use a metallic spatula to clean the edges of the cake, then maintain the spatula horizontally and pull the ridge of frosting from the skin edge throughout the highest of the cake. Pull up barely with the spatula to take away the surplus buttercream.
- Crumb-coat the 8-inch cake tier in the identical method. Return each tiers to the fridge and permit them to set for a minimum of half an hour earlier than persevering with.
Cowl the desserts with fondant and stack the tiers
- Utilizing a clean plastic rolling pin, roll 1-1/2 lb. of the white fondant right into a tough circle a minimum of 16 inches in diameter and about 1/4 inch thick.
- Roll the fondant round your rolling pin, then unroll it to drape the fondant over the 6-inch cake tier. Easy the fondant excessive and sides of the cake. Utilizing an X-ACTO knife or scalpel, trim away the surplus fondant across the base of the cake. Use the fondant smoothers to clean the floor.
- Cowl the 8-inch cake tier in the identical method, utilizing 2 lb. of the white fondant, and rolling it to a circle a minimum of 18 inches in diameter.
- Insert a dowel into the middle of the 8-inch tier and mark it the place it begins to stay out of the cake. Take away the dowel and lower it on the mark. Minimize three extra dowels the identical size. Return one dowel to the middle gap, and insert the remaining three dowels, evenly spacing them across the heart. Make sure that they’re positioned inside the diameter of the place the 6-inch tier will sit above them.
- Unfold a skinny layer of buttercream over the 4 dowels, and place the 6-inch tier on high of the buttercream. Return the stacked cake to the fridge for a minimum of an hour to ensure it’s safe.
To embellish the cake
- Roll out the pale blue fondant to a strip 26 inches lengthy by 3 inches large and 1/4 inch thick. It needs to be lengthy sufficient to wrap across the backside tier.
- Create a scalloped edge on one facet of the pale blue strip by inserting the 3-1/2-inch cutter half on the sting of the strip and half off—in different phrases, the fondant edge bisects the circle. As soon as the primary semicircle is lower, start the subsequent one at its edge, making a peak between every half circle.
- Roll up the strip like a spool and unroll it across the backside of the cake. Brush the cake with a small quantity of water to assist it adhere, if vital. The seam shall be lined later with a row of pearls.
- Roll about 1/4 lb. of white fondant right into a rope that’s 1/4 inch in diameter and about 26 inches lengthy. You should use your palms or an extruder. Brush a small quantity of water onto the cake alongside the scalloped fringe of the blue ribbon and apply the rope. Begin on the seam on the blue ribbon (that is so each seams match), and gently press the rope into place alongside the scalloped line.
- To make tiny ribbon roses, pinch off a marble-sized piece of blue fondant from the remaining fondant and roll tiny ropes (in regards to the thickness of a bit of yarn). Coil the rope right into a spiral rose form, aiming for roses about the identical dimension because the pearls. Set the roses apart on a parchment-paper-lined cookie sheet till you’re prepared to position them on the cake.
- To make the tiny leaves for behind the ribbon roses, pinch off a really small quantity of inexperienced fondant—about half the dimensions of the ribbon rose. Use your fingers to roll the little little bit of fondant right into a teardrop form. Press the teardrop between your fingers to flatten it right into a leaf form. Place the leaves alongside the ribbon roses on the cookie sheet and put aside to dry.
- To create the pearl and rose sample on the cake, begin on the underside tier and place a pearl or a rose onto the cake about 1/4 inch above every scallop peak. Brush on a small quantity of water or piping gel to assist the pearl or rose adhere. If you’re making use of a rose, place the leaf with the rounded finish below the rose, permitting the pointed finish to stand proud of behind it.
- Subsequent place a pearl or a rose about 1/4 inch above the center of every scallop. Use these two strains that you just’ve created as a information to use the pearls and roses up the remainder of the cake and area them about 1-1/2 inches aside. To imitate the sample pictured right here, use extra pearls than roses. Place roses after each one or two pearls. Attempt to area the roses out evenly across the cake.
- To complete the design, brush a skinny line of water across the backside fringe of the cake and line the sting with pearls. Brush the seam of the blue ribbon and canopy it with pearls, too.
- Apply the bow topper to the cake utilizing piping gel to carry it in place.
continued on next page
Advertisements